Congratulations! to Joanna, I am delighted that the Christmas Patchwork stamps that are New - SOLD OUT during the TV shows on Create and Craft today.
I really enjoyed designing both these stamp sets
I used the Grid technique with the patchwork stamps for all of these samples. I created the grid to help stamp each square in the right place when creating a pattern with the patchwork stamps.
You can download the grid with instructions here
Here are the samples made by me that were on Joanna's Shows today.
Tree easel card
First
I cut a template for the tree shape then drawing round it onto white
card to use as a guide to stamp my patchwork pattern with versamark and
WOW GLOW IN THE DARK embossing powder.
I
then water coloured each green square with distress inks using 2
colours. Only the green tree is glow in the dark. The embossing on the
base is normal white powder.This card is great fun, I couldn't stop
looking at it glow in the dark Lolol!
This is how much it glows in the dark!!
Snowman Hearts
This card was so simple to do. I die cut 8 hearts - Stamped half with the snowman and half snowflake stamps and the other half using the full snowflake and half snowflake stripe stamps all with a lovely pigmant ink pad in blue shades. - placing them around the card that makes a star shape in the middle. I used a glue pen and sparkly foil to add faux stitching and the Merry Christmas is from an embossing folder - I used a pen to add dots to look like stitching on the letters.
Blue and white quilt card
I stamped the outer part first using the grid to guide to keep it all square, then on another piece of card I stamped the 9 square piece, cutting out and layering it on top of the base pattern. The very middle is the star stamp from the Joanna Sheen I love knitting stamp sheet that I designed for Joanna last year. I stamped it 4 times in blue layering it up and adding glitter to the top star finithing off with a gem in the centre and a few punched snowflakes in the corners. the faux stitching was done with glue pen and silver holo foil.
Christmas patchwork Stockings
I cut out 2 stocking shapes one green, one grey. I stamped a patchwork pattern onto each one embossing with white powder. The white tops and toe/heel parts are cut out of felt. The rest of the card was done with embossing folders and punches.
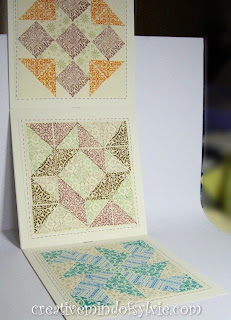
Patchwork sampler
I decided to stamp a selection of 8" x 8" blocks using both the Everyday and Christmas stamps. I used the grid to keep everything in line as I stamped. These show how pretty the stamps can look and it is really simple to do.
Paper 3D star
I used this fabulous pattern that I got from the web a few years ago. I cut out 5 of the larger pieces and stamped the patterns using 2 triangle stamps and 2 colours. I embossed every time using a lovely gold sparkle opaque powder for a glimmer of gold. All the lines are done with a versamark pen and gold embossing powder. Once all 5 were stamped, embossed and scored, I folded each one and glued together with wet glue as per the instructions from the link above. I think this makes a wonderful decoration. These stars look fabulous stamped or unstamped and I am quite hooked on them LOLOL!!
Patchwork Cushion
I stamped the pattern onto 2 6" x 6" squares of white cotton. I used distress inks but versacraft inks would have been so much better but I didn't have any. I still ironed each one after stamping to set the ink although this will never be able to be washed... as the ink would vanish Lol! I made 2 tassels with bright red wool. I stuffed and sewed the cushion adding 2 sparkly buttons in the middle.
Raffia wreath patchwork card
I stamped and embossed with white part of the pattern onto kraft card, I then stamped and embossed with red onto cream card, I cut the red ones out and pieced them onto the kraft card to finish the pattern I wanted. I stamped a small square in the middle with 4 triangle corners layering this on top. I made the raffia wreath by twisting the raffia in and out as I turned it.
Stained glass look
Used
a free STAINED GLASS template. Printed
out 8 – used promarkers to add one colour on each
sheet. I then stamped and embossed with clear powder on each coloured part using different stamp designs. Cut out each portion of the design and PAPER
PIECED them onto the last printed
template using it as a guide. Once together I inked
with distress ink
Advent Calendar
Stamped-embossed
in Gold all the squares. Painted each
of them according to the patterns.
Stamped
and cut out inside of doors -sticking the
advent squares to fronts. Glued whole design onto
12” paper - Matt and layered design
onto papers and board. Added
die cut numbers inside the doors.


Don't watch tv crafting, but fab stamps and such inspiring cards
ReplyDeleteTilly