Showing posts with label Promarker pens. Show all posts

Tuesday, May 29, 2018

Sample Cards for May TV show

Here are the sample cards I made for the TV show that aired earlier in May.

 This card features the new Signature Lille Corner die


 This

The card below features the new Signature Lille Corner plus Versailles Corner die
The topper on the card is the new Signature Orchid Trio Die set


The card below features the new Signature Bordeaux Corner Die
The Topper is the new Signature Vase of Flowers die


The card below features the Signature Vase of flowers die
The background is made up from the same die  using 2 colours.


The topper and on the side of the card below is the new Signature Orchid Trio Die set


This card features the new Signature Tied bunch of Roses die
I die cut all the Roses and the background behind the roses from
the Hunkydory watercolour paper kit, I coloured the stems
and leaves with Promarker pens.


This is another card using the new Signature Tied bunch of Roses die
I cut the roses from matt card and coloured the leaves and stems with
Promarker pens.  The pretty corners are Signature Toulouse Corner die


All the cards below feature  sheets from the new 


Thank you for visiting my blog today :)  xx Hugs xx

Saturday, December 17, 2016

Signature designer Fairy Die samples

I really enjoyed playing with the new Joanna Sheen Signature Dies -Designer Fairies that I designed for Joanna.
Here are the samples I made - some were shown on her last TV show.
 The image is from Joanna Sheen HollyPond Hill CD Rom


 This uses a clear snap together bauble 10cm.  I lightly sponged white gesson inside each half.
The die cut fairy sticks to the inside. I punched a small hole with my BigBite to poke the little
string of rice lights through.. clipped the bauble together - added the bow and ribbon hanger and then
added paper over the battery case to look like a tag.
I covered the mason jar with with tissue paper keeping it smoother in the middle with the creases top and bottom where I added glitter when it was dry. I stuck the die cut fairy and dragon fly to the inside of jar along with the extra cut out bits to create the scene.  I punched a hole in the lid for the small rice string lights to poke through.  The battery pack is glued to the top of the lid covered by the flowers and leaves but still accessable to turn it on and off.
 For the fairy mobil I used part of an embroidery hoop wrapped in ribbon with the various colour Fairy die cuts dangling down on more ribbon.


Here are a few extra cards that were on the show using more of Joanna Sheen products


Thanks for visiting today 
I hope you are enjoying the run up to Christmas!!!  I have made some Christmas cards and presents  I can add them to my blog once they have been given and opened.!! Watch this space!!


Sunday, October 2, 2016

TV sample cards and a free template

Here are some sample cards I made for Joanna Sheen's last TV shows.


This card was fun to make with the little lights added to the tree.
The bunting and backing paper are from the JS Christmas Paper pad.
The topper frame is an envelope to the thickness of the battery case (about 5 mm)with a cut out
opening – also helps keep the light inside where it's
wanted. I printed the image from the CDRom twice onto matt photo paper and again onto some vellum.
I punched holes where the candles are on the tree, layered the vellum under the image matching it up.
I cut out the little girls from the second printout layering them on top.
On a piece of card the same size as the topper I stuck down the lights where the candles are on the tree. I added mini Holly dies
The starry night Edger makes a magical edge for the easel to stand against.. I added mini Fir branch dies and the greeting and some pearls.

This card uses some burlap sparkly ribbon that
 I pulled apart for the frame around the topper.
Used Mini Fir branch die with faux red pearl pen added for a 
touch of festive colour.
Added The Holly Edger in 2 rows with light
inking for a more vintage feel.

Printed Angel and flowery papers from CDRom
All layers were sanded, pieced and added faux
stitching. Starry and snowflake papers from
JS Christmas pad.
andmini Fir die coloured with promarkers
Tiny pearls add sparkle and the pom pom
braid gives the feel of snow.

 
Printed out Santa topper adjusting the colours
to give a more sepia look. sanded the edges and added glitter..
Distressed the edges by sanding on all
4 backing paper layers from JS Vol 2 pad
added glitter on edges of top 2 layers
Layered them all onto the Red card stock
Added ribbons and silver bells plus the 25th 
with promarker pens
Added a mixture of real flat pearls and faux
pearls with a pearl pen.


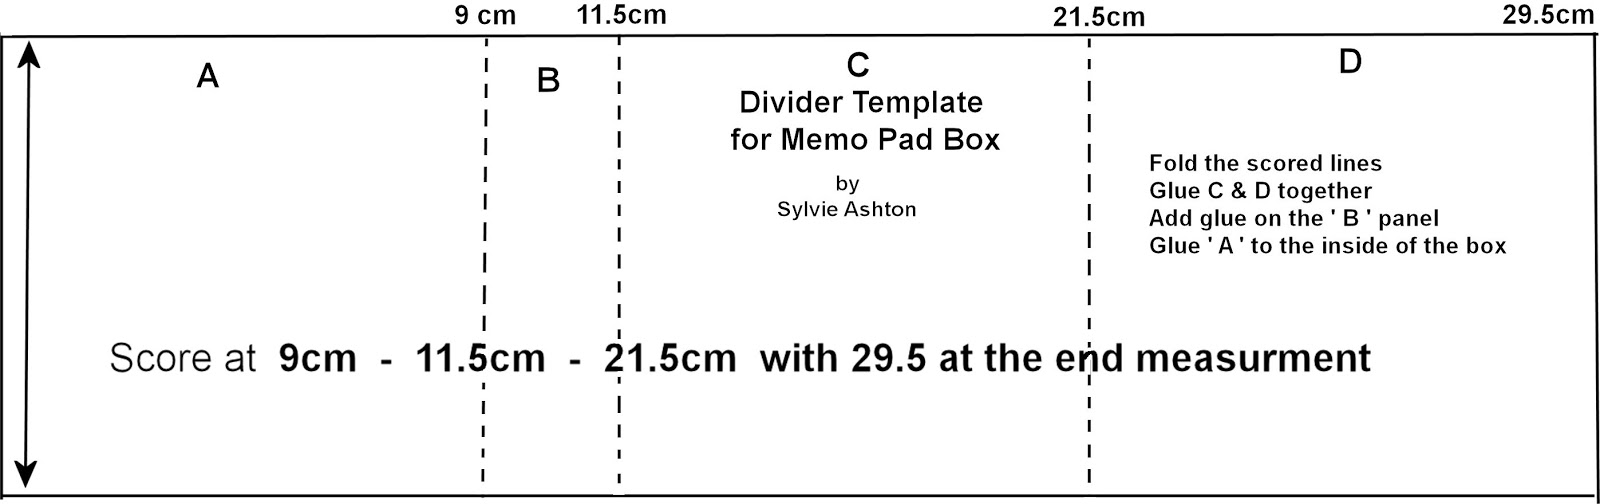
I made box up as per template instructions
Added background paper from JS Vol 2 pad
also pretty winter images from the Jane Netley Mayhew Pad.
added Pom Pom braid around edge
Basic template & Instructions available at the end of this blog.


... and with the lights on....

 
I printed out the image from the Josephine Wall project book (No 9 Dew Drop Dancers)
Matt and layered the image, punched a hole
under the top right leaf (where the added layeres
will cover it up).then punched a hole through the main layer on the card and through the card front itself.
Then I poked the little lights through the hole to the image glueing them onto the drew drop carefully. Once this was dry I layered up all the layers and the netting. The Fairy Aurora die cut x2 from purple card – I added sparkly organsa in-between the layers of her wings for a more magical effect.
The lights are taped unside the card making it easy to turn them on and off.

I cut the tree shape from a Wood effect paper from the JS paper pad Vol 2 I chose the part with a knot in the wood so I could cut it out and layer the picture beneath. I cut a rough door shape for the fairy door and again adding an image to a secret word beneath the tree cut out. The die cut mini fairies have wings with sparkly organsa for shimmer. I added glitter to the main Topper image (No 4 Secret Garden) from the Josephone Wall project book and layered it up
The inked backing paper is from the pad along with the grass and floral edge.

I tore several pieces of the papers from the JS
Vol 2 paper pad to make the background. I cut out various little children from the Faye Whittaker pad plus the little boy by his beach hut.
add more to the little scene.
I used a red pen to add the red stripe around the edge of the card.

Used the Weathered Wood backing paper from the JS pad Vol 2 – cut out each plank and sanded back and then inked with Blueprint Sketch distress ink. Die cut the beach huts and birds
the Lifeboat ring was cut freehand with added
string for a beachy feel.

Thanks for visiting today but before I go: I made  up these templates for you to print out and use if you would like to have a go at making your own Memo pad box - just print out (to get actual size, print each of them on 2 halves and stick the A4 bits together if you don't have a printer big enough)


Thursday, June 30, 2016

Tobermory card

I made this card for my Son and Daughter-in-Law for their Wedding Anniversary.  They got engaged in Tobermory while there on a holiday nearly 10 years ago!...

I used Joanna Sheens Signature Townhouse Trio dies to create the little houses along the seafront and layered various papers from the Joanna Sheen Collection Vol 3 Pad.. it's all a bit of fun and I know it isn't really like Tobermory... but, when they opened the card they recognised it immediately... so my job was done Lol :)


I coloured each house using my Chameleon pens and Promarkers. The little boats were free cut by me very simply Lol.. I layered some gold paper behind the windows and used a white gel pen to draw the fench along the seafront and the waves.  
It was a lot of fun to do.

Thanks for visiting today
:) Hug.x

Monday, November 10, 2014

Signature Stencil Sample cards

Here are some sample cards I made using the new Signature Stencil / Masks that I designed for  Joanna Sheen..


Embossed purple card panel - inked lightly over with Tim Holtz seedless preserves.

Embossed pearly card


Watercolour crayon technique.  I found this wonderful technique on the web here - the only difference I did was to run my mask through my cuttlebug to impress the colour onto card.. it works really well.

I embossed - inked with versamark and brushed mica powder over the panel. I used the new Signature Classic Lace background die for the panel on the right.

I appliled ink to the stencil and run it through the cuttlebug to get this look

Simple embossed and sanded back to get this look

Another Watercolour crayon tecnique - using golds, silver and white crayons with a touch of blue.. it gives a more soft look

Back panel was embossed and sanded back and the front panel is more watercolour crayons.

 Embossed parchment paper first - then coloured flowers on back with promarker pens, then I hand embossed each flower to get this effect.  The butterfly is from the I love knitting stamp set

Thank you for visiting today.  I hope I have inspired some of you to dig out your own stencils to play with or go along to the Joanna Sheen Website and treat yourself :)

LinkWithin

Related Posts with Thumbnails