Showing posts with label glamour dust. Show all posts

Friday, June 8, 2012

~FREEBIE~ A Palace for you

With all the Jubilee celebrations last weekend I thought I'd use some of the  images and papers that seem to be free  in all the craft magazines at the moment.
I wanted to use the Iron Gates stamp that I designed for Joanna sheen on the Country House stamp sheet , I needed a Palace to go with the gates so I drew this one on the computer.
Please feel free to click on the image, click view image to save the PNG.  It will print out approx  8" wide, or smaller if you wish.


Here's a card I made using the image and the Iron Gates from the Country House stamp sheet


To make this card I first printed out the Palace and coloured it with promarker pens. Then I stamped the gates using versamark ink adding gold embossing powder to the tips of the gate and black to the rest of them.. I stamped and cut out the stone gate posts and stuck them next to the gate.  I used one of my spellbinder nesties to draw around and cut out the shape and mounted it onto black card.   The pretty bunting is a freebie from Crafts Beautiful magazine. 

I made the roses using a spiral die, cutting them out of buckrum.. they are so easy to make and look gorgeous on cards or other projects.

 Thank you for visiting my blog today I hope you like the Freebie.
Hugs
xxx

Wednesday, December 21, 2011

Country house sample cards

..More to come in January. These were launched yesterday on C&C on the Dawn Bibby show. Here are the cards I made in more detail.
This card was shown like this by Dawn
..but it is an easel card.....
..with a drop down draw bridge where I've added a little notebook and greeting

I stamped the brick stamp with purple ink onto velvet paper for the castle adding little glittered rectangles for the windows, I inked with Tim holtz seedless preserves ink for most of the colouring and stamping. The drawbridge wood is an embossing folder.

I used Thomas Kinkade backing paper to stamp the gates and for the background, so the gates blended in. The stone stamps are used to create the border around the card. Inside is one of Joanna Sheens wordy stamps
I stamped the stone doorway first and made a door to fit it, scoring with a scoreboard and adding extra texture freehand with the scoring tool. I stamped the urns and inked them a little bit to add dimension and filled them both with punched flowers and leaves. The brick wall is the brick stamped with distress ink and a water brush to colour lightly.
Stamped and gold embossed flower and coloured with promarker pens and layered. The leaves are from the JS Pressed flower rubber stamps
Thanks for looking

Sunday, July 3, 2011

Less is More week 22

This week the challenge over at the Less is more blog is Colour... Shades of Blue.

I wanted to use one of my own digi images - Klimt style mermaid - I actually made two cards, but the first card turned out a disaster so I scrapped the first idea and came up with this second card.. here's what I did - Using paint shop pro., I spun her on her side, put a frame around her... added some text and a Happy Birthday. I am lucky that I have a wide selection of gorgeous foils to play with so I printed her out from my laser printer and then foiled her using 2 different colour glossy blue foils. I lightly coloured her in with several shades of blue promarkers then added glitter on her hair, fin and tail and around the frame. I think that mounting it onto the navy card really makes this card work.

Thank you for visiting - see you soon...
Hugs

- add on -
I have now added this as a framed mermaid just incase you would like to buy one to print out on your own cards - HERE

Saturday, May 28, 2011

28th May ~FREEBIE~


Hello Bloggers...
I've had trouble getting signed into blogger today.. I am hoping that this post will make it through..

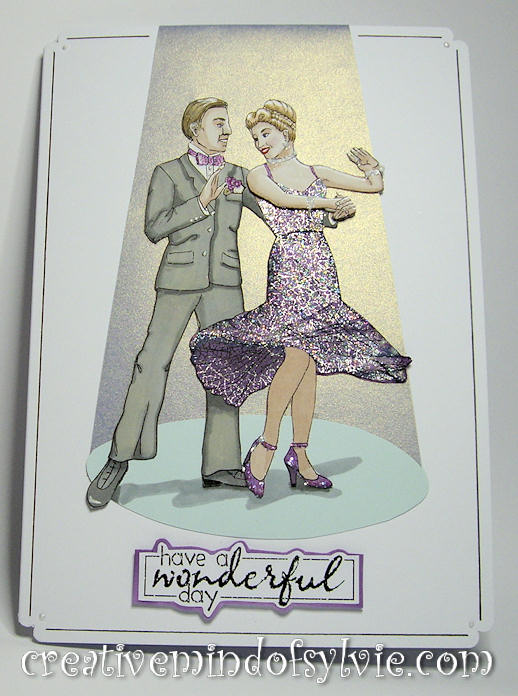
For todays FREEBIE I had to draw my version of a lovely vintage photo of Fred and Ginger dancing... here it is..

I hope that you will have lots of fun with this image as it is just crying out to be full of colour and bling.. just like this card I made ...

I paper pieced her dress with some pretty paper. They are both coloured with promarker pens and have added a pearl pen for her jewellery. The spot light beam is irridescent vellum which really does catch the light in a lovely way... as you can see here....
.... the sentiment is from the Create with TLC blog

I hope you like my freebie for you today - I would love to see your comments and of course it would be fantastic to see what you can do with it too..

See you soon
Hugs

Monday, May 9, 2011

More WOW with Swans

I drew these swans the other day and had to make a couple of cards with them.
For the first card I used 2 embossing folders to create a background image and simply stuck the cut out swans with foam pads.. adding the words on the side like a tab. I pierced the edges of the card just to add more texture - a really simple card..
This will be my 3rd submission to the
Less is more challenge this week.. White on white cards are so much fun to make! here is my White on white card No. 3


For the second card, I printed the swans out twice, one for the background and one to add the cut out swans over the top. I used Tim Holtz distress inks to create the background. I decided to use a very pale blue card to blend with the image adding a pale pearlescent green card under the punch out area to balance the card. Of course a little bit of glitter had to be added to the wings..and small amounts to the water too plus a few pearls.

Thank you for stopping by my blog today..
See you soon
Hugs

Saturday, May 7, 2011

Less is More Challenge -Week 14

Over at the Less is More Blog this week it's a colour challenge - White on White.... Cool!.. it's not something that I have done myself that often but I love seeing it onother blogs. So I have really enjoyed making these two cards for this weeks submissions.
Here's the first card.
I used the Sizzix chandelier embossing folder running through my cuttlebug straight onto the card but leaving the top part off. It was easy to use my glue pen to add some glamour dust over the embossed parts. I foiled sentiment in satin silver and used my embossing board to add straight lines to match the image. The bow finishes it off. Honestly it was so easy I really recommend this folder to everyone for a quick and glam card.

Here's my second card for the challenge.. it was a bit fiddly and I nearly gave up... but I am a stubbord girl as once I start I have to finish..Lol... so here it is..
I embossed the lines for the 'floor' using my score board, then cut out my snuggle birds and embossed them using the freebie folder with the latest issue of Docrafts Creativity Magazine. I cut out 3 of the Tim Holtz bird cage dies from a thicker white card which looks a different kind of white. I curved 2 of the cages to create dimension and cut away part of the front one to make a door opening... the door was created using the 3rd die. I was going to add flowers but decided to keep it simple so added some flower patterned lace inside the cage with a few butterflies to add movement. I couldn't resist adding some white flat backed pearls where I could... after all it is an Anniversary card Lol
Thank you for visiting this week and many Thanks to Chrissy and Mandi for such inspiring challenges and the chance to see so many bloggers creating such beautiful cards.
Hugs

Saturday, April 30, 2011

~FREEBIE~ Sunday 1st May


Hello Bloggers,
Who hasn't been inspired by the wonderful coverage of the Royal Wedding on TV on Friday. I loved it.. .total eye candy. It inspired me to draw this week's Freebie image... here it is.. click on it to save a larger image

I hope you like it and I would love to see your cards ...
Here's a card I have made.....
I am putting it forward for the Less is More Challenge this week which is to use Thankyou or Congratulaions on a card... I hope it qualifies as it's a bit more than less Lol!.. anyway, I had great fun drawing it and then using it. I printed it twice.. I inked one with Tim Holtz Antique Linen to create a lovely soft background and then I coloured and decorated the second bride, cut her out and stuck her over the background one. Adding white gell pen and glitter to her dress gives it the look of lace.

Thanks for visiting...
See you soon
Hugs


Thursday, February 10, 2011

Beaded Bodice card

There's a brand new challenge blog that has just started and looks very interesting to me, so I thought I'd join in with it. It is called "Less is More" - they aim to promote the making of classic Clean and Simple cards, with different challenges each week to help stimulate your imagination. The first colour challenge is - Black, white and pink.
I don't know why but this beautiful beaded bodice stamp that I have had for years popped into my head for it, so I had to use it. Here is my very first challenge card...

Like I said the stamp is called Beaded Bodice and was made by Stampendous many years ago, I don't even know if they still make it, all I know is that I love it and it will always be one of my favourites. After stamping it directly onto the card, I masked the bodice and shaded with pink pastels then added specs of glamour dust to give a sparkle to it. I doodles around the edge of the card and wrote the message myself.

I intend to join in with this challenge blog every week as it looks so much fun.. why not take a look for yourself.. here's the link again

Thanks for visiting... see you at the weekend...

Hugs!

LinkWithin

Related Posts with Thumbnails