I thought I'd do another card for this week's challenge over at the Less is More Challenge blog -this time I decided to use my own background paper that I made for a Freebie available in my previous post . I die cut the hearts from some lovely hunkydory card and then put them in an embossing folder with a rose on it ( I can't remember the name of it sorry).. embossing the roses on the middle heart and just leaves on the smaller ones. I sanded the hearts lightly revealing the white core of the card.. The sentiment is foiled. oh... here is the card....
Wednesday, June 29, 2011
Sunday, June 26, 2011
26th June ~FREEBIE~
Today I have made a background paper for you to print and use how ever you like. I love Roses and they are everywhere you look at the moment.. Here is the backing paper.. it measures A5 (8 x 6") approx print size.
Although the background is pink... it can easily be changed in any graphics program. Plus, if you want it to be a little less bold, try printing it out using the 'draft' setting on your printer options.
I have printed this out using normal and draft for the two cards I have made. I am not totally happy with the cards as they just wouldn't go right for me, I have an enormous headache and I think it's messing with my cardmaking mojo Lol.. anyway, I will share them anyway, so here are the two card examples using the Freebie background. The first one with the dragonfly is with the normal print.. and the second one with the mice is one I printed out on draft.. it is much paler. The dragonfly is a rubber stamp from the Sparkle and Romance collection that I designed for Joanna Sheen.

I hope you find this useful and inspiring in some way and I really would love to see any projects you make using the Rose Background..
Are you enjoying the weekend?.. the weather has turned very hot here - I think I might be melting!!!
Thanks for visiting...
Although the background is pink... it can easily be changed in any graphics program. Plus, if you want it to be a little less bold, try printing it out using the 'draft' setting on your printer options.
I have printed this out using normal and draft for the two cards I have made. I am not totally happy with the cards as they just wouldn't go right for me, I have an enormous headache and I think it's messing with my cardmaking mojo Lol.. anyway, I will share them anyway, so here are the two card examples using the Freebie background. The first one with the dragonfly is with the normal print.. and the second one with the mice is one I printed out on draft.. it is much paler. The dragonfly is a rubber stamp from the Sparkle and Romance collection that I designed for Joanna Sheen.

I hope you find this useful and inspiring in some way and I really would love to see any projects you make using the Rose Background..
Are you enjoying the weekend?.. the weather has turned very hot here - I think I might be melting!!!
Thanks for visiting...
Saturday, June 25, 2011
LIM challenge week 21 - Sketch
Over at the Less is More challenge blog this week it's 'Sketch' week. Here's my card using the sketch below..
and here is the 'Sketch'
I wanted to use clouds or sheep.. I don't know why, it's just what I imagined when I saw this sketch.. I went with clouds because it is easier and I am feeling lazy today Lol... I got a lovely template for these clouds from Mel Stampz Blog the template is further down the page. I used a bit of Tea Green promarker and covered the edges with glamour dust.
The little baby is one of my digis - you can find it HERE I coloured the baby with promarkers so this card could be for a boy or girl.. I might do the boy one tomorrow.
Thanks you for visiting today.. have a lovely weekend.
and here is the 'Sketch'
I wanted to use clouds or sheep.. I don't know why, it's just what I imagined when I saw this sketch.. I went with clouds because it is easier and I am feeling lazy today Lol... I got a lovely template for these clouds from Mel Stampz Blog the template is further down the page. I used a bit of Tea Green promarker and covered the edges with glamour dust.The little baby is one of my digis - you can find it HERE I coloured the baby with promarkers so this card could be for a boy or girl.. I might do the boy one tomorrow.
Thanks you for visiting today.. have a lovely weekend.
Monday, June 20, 2011
Card 2 - Less is more - Monogram
Here's my second card for the challenge over at the Less is More Blog this week.. Monograms..
The Monogram 'L' is a freebie over at the Create with TLC blog.. I coloured it with promarker pens, cut it out glued it to black card and then white card.. I cheated and drew a red line around the black card then used a black promarker pen to edge the black around the whole lot before sticking it onto the card.. too many layers other wise..as the black card is quite thick... Those lovely Ladybirds are part of a gorgeous Inkadinkado clear stamp set called 'Gem Stone insects'... aren't they just so cute!.. I coloured all three then added black gems and tiny little clear gems and stuck them onto the card on foam pads.Thank You for all those lovely comments about the freebie yesterday... it means alot to me.
Thanks for visiting.......see you soon.
PS... You can find the Monogram 'L' ladybug HERE
Thanks for visiting.......see you soon.
PS... You can find the Monogram 'L' ladybug HERE
Saturday, June 18, 2011
~FREEBIE~ 18th June
I have a FREEBIE digi image for you this weekend... I was totally inspired by a lovely picture on cover of a very old magazine, I had to draw one to use on cards. Here she is... Click the image for a larger picture to save...
I have coloured her with my promarker pens, cut her out, then put her on this 6" square card with foam pads to lift her a bit. The 'Sun' was created using Tim Holtz Mustard Seed distress ink directly onto the card and I printed and cut out the sentiment that I got free from the Create with TLC blog.. and here is my card..
I have decided to enter this into the Less is More challenge for this week.. as I have used a Monogram.. Lol!.. I will probably do another card for this challenge aswell and I already have another one in mind... See you soon... enjoy the FREEBIE and I would love to see what you create with her..
Have a lovely weekend....
Hugs
Wednesday, June 15, 2011
Easel Box card
I made my very first Easel Box card for my friend's Birthday. I decorated it using one of the pretty ladies from my Kanban Elegant ladies kit - inking the edges so that it blended in with the cream and blue wallpapers that I covered it with. The sentiment is from the TLC blog.. I added the lace, pearls and gems to finish it off and put a few paper pads in the drawer. My friend was very happy when I gave it to her today, so I am happy.
Happy Birthday again Sue..


Thank you for visiting.. See you again soon
Hugs
Hugs
Sunday, June 12, 2011
Less is More Week 19 - CAS One layer card
Has a week gone by already?!... The challenge over at the Less is More blog is ~ In the Frame ~ and to have a one layer card. We can be as inventive as we like and some of the cards already submitted are just fabulous!.. all very inspiring to me.
For this challenge I have made two cards... my favourite is this card,
I've had this UM stamp for at least 10 years - swapped from a friend for craft items!.. I think we are all digging out our old stamps for something new to do.. and this one will be one I will be stamping again and again as it is perfect for CAS cards. I coloured it using very pale shades of promarker pens and covered the wings with some clear 'oil on water effect' foil. Here's some close ups of those wings:


For the second card I did quite a bit of masking. The vase was created using a vase shape hole cut out of paper and then inking and stamping the pattern using a clear stamp from the Anna Griffin lace set, the tablecloth is also from the same AG lace set.
The bird is from a free Chritmas set from the Docrafts magazine...it's a Robin Lol!... and the birdcage is from the Papermania set that is raising money for Cancer this year. I finished it by adding the bow with black pen and drawing the frame. I'm not sure I like this one but it took so long to do, it seems a shame not to share my efforts - good or bad... Lol..
Thanks for visiting.... see you soon.
For this challenge I have made two cards... my favourite is this card,
I've had this UM stamp for at least 10 years - swapped from a friend for craft items!.. I think we are all digging out our old stamps for something new to do.. and this one will be one I will be stamping again and again as it is perfect for CAS cards. I coloured it using very pale shades of promarker pens and covered the wings with some clear 'oil on water effect' foil. Here's some close ups of those wings:

For the second card I did quite a bit of masking. The vase was created using a vase shape hole cut out of paper and then inking and stamping the pattern using a clear stamp from the Anna Griffin lace set, the tablecloth is also from the same AG lace set.
The bird is from a free Chritmas set from the Docrafts magazine...it's a Robin Lol!... and the birdcage is from the Papermania set that is raising money for Cancer this year. I finished it by adding the bow with black pen and drawing the frame. I'm not sure I like this one but it took so long to do, it seems a shame not to share my efforts - good or bad... Lol..Thanks for visiting.... see you soon.
Sunday, June 5, 2011
Less is More week 18 - Monochrome
The challenge set for us Limettes this week is
The punched border is because I stuck the paper on Wonky!!.. so it covered that up... actually I rather like it more with the border... so it's a Happy accident as they say.. Here's the next card using 2 strips of the same background paper.

MONOCHROME
Definition:in shades of one colour, using or displaying only shades of one colour or black & white.
Although lots of ideas flashed through my head when I first saw the challenge... I soon realised that this could be a hard one for me, as I love to use lots of colours. , so I spent most of the day yesterday just thinking about what I would like to do.
I decided to use the Pressed Flower Roses stamps from Joanna Sheen.in Shades of RED.
I created a background paper : I stamped an A4 sheet using various roses, masking them and then stamping the two sizes of rose leaves all with Tim Holtz fired brick distress ink, so it appears that the leaves are behind. Then I coloured the background using a red Promarker pen. I managed to create two cards out of the paper
I decided to use the Pressed Flower Roses stamps from Joanna Sheen.in Shades of RED.
I created a background paper : I stamped an A4 sheet using various roses, masking them and then stamping the two sizes of rose leaves all with Tim Holtz fired brick distress ink, so it appears that the leaves are behind. Then I coloured the background using a red Promarker pen. I managed to create two cards out of the paper
The punched border is because I stuck the paper on Wonky!!.. so it covered that up... actually I rather like it more with the border... so it's a Happy accident as they say.. Here's the next card using 2 strips of the same background paper.
The butterlies are punched from the Martha Stewart large butterfly punch and coloured with a red promarker.
Thank you for visiting.. I hope you like what you see.
See you soon...
Hugz
...and here's another card that I couldn't resist doing using some paper roses I made using the sizzix die mentioned in the last post. and some of the stamped rose leaves - again I used Tim Holtz fired brick ink to colour everything.
Thank you for visiting.. I hope you like what you see.See you soon...
Hugz
Friday, June 3, 2011
Thank you sizzix
We've been enjoying creating flowers at the craft club I go to using all sorts of punches and dies. I used the 
...Inking it slightly with Antique linen distress ink was needed on this card.. I added a border of Martha Stewart large lattace matching the corners up...all the little flowers are also from a MS punch..inked lightly again with little flat back pearls in the centres. I punched the butterlies and coloured them with promarkers and a white gel pen to make them stand out more and look sort of real Lol... well, artistic licence again..
I really enjoyed making these cards..... so Thank you Sizzix!!
Hugs
Sizzix Beth Reames Flower 3-D bigz Die for the roses on the first card. I inked them up before rolling and added some stemens.
I used a lovely Sizzix embossing folder for the 'Thank You'.... the butterflies are punched from the Martha Stewart stamp and punch ... and the beautiful textured paper on the bottom of the card is a piece of gorgeous fabric wallpaper.
I used a lovely Sizzix embossing folder for the 'Thank You'.... the butterflies are punched from the Martha Stewart stamp and punch ... and the beautiful textured paper on the bottom of the card is a piece of gorgeous fabric wallpaper.Here's another card I made using the same wonderful Sizzix 'Thank You' embossing folder...

...Inking it slightly with Antique linen distress ink was needed on this card.. I added a border of Martha Stewart large lattace matching the corners up...all the little flowers are also from a MS punch..inked lightly again with little flat back pearls in the centres. I punched the butterlies and coloured them with promarkers and a white gel pen to make them stand out more and look sort of real Lol... well, artistic licence again..
I really enjoyed making these cards..... so Thank you Sizzix!!
Hugs
Tuesday, May 31, 2011
..more LIM pick-a-square cards
I couldnt' resist making 2 more cards for the Less is more challenge this week - Pick a square -
I found this lovely image on the internet of Marilyn Monroe and thought of the famous Andy Warhol look... and came up with this.....
I used promarker pens to colour each square then I matted it onto black paper.. the sweet little sentiment is from the free clear stamps that came with the docrafts creativity magazine this month.
... for the next card I decided to print and colour some of my own designed Kokeshi dolls group 1 over at the Stitchy Bear Stamp shop...again the sentiment is from the same freebie set I just mentioned. I cut out the set of dolls and stuck them to the lilac card.
Thanks for visiting..
See you soon....Hugs
I found this lovely image on the internet of Marilyn Monroe and thought of the famous Andy Warhol look... and came up with this.....
I used promarker pens to colour each square then I matted it onto black paper.. the sweet little sentiment is from the free clear stamps that came with the docrafts creativity magazine this month.... for the next card I decided to print and colour some of my own designed Kokeshi dolls group 1 over at the Stitchy Bear Stamp shop...again the sentiment is from the same freebie set I just mentioned. I cut out the set of dolls and stuck them to the lilac card.
Thanks for visiting..See you soon....Hugs
Saturday, May 28, 2011
LIM week 17
Over at the Less is More blog this week the challenge is to create a card using a recipe - pick a square.. here's what they say..
' you can choose which of the 5 SQUARES from our plan you wish to use to place the image of your card, leaving the rest as PURE WHITE SPACE!'

Here's my card
I'ts just a bit of fun!! Someone will appreciate it and it will make them smile Lol!The T-Rex smile is over at the StitchyBear shop - I downloaded the sentiment from the Create with TLC blog. I coloured the dino with promarker pens... Pastel Beige and Khaki.
Thank You to Chrissie and Mandi for starting such a fabulously addictive challenge blog... I am enjoying it every week.
Hugs
28th May ~FREEBIE~
Hello Bloggers...
I've had trouble getting signed into blogger today.. I am hoping that this post will make it through..
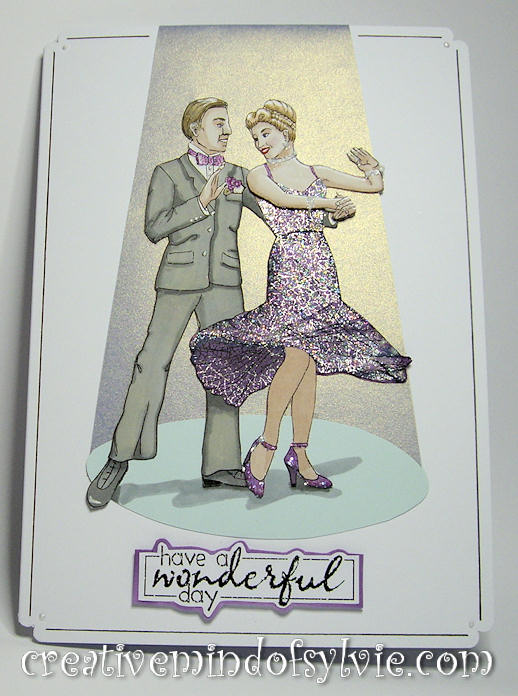
For todays FREEBIE I had to draw my version of a lovely vintage photo of Fred and Ginger dancing... here it is..
I hope that you will have lots of fun with this image as it is just crying out to be full of colour and bling.. just like this card I made ...
I paper pieced her dress with some pretty paper. They are both coloured with promarker pens and have added a pearl pen for her jewellery. The spot light beam is irridescent vellum which really does catch the light in a lovely way... as you can see here....
.... the sentiment is from the Create with TLC blog
I hope you like my freebie for you today - I would love to see your comments and of course it would be fantastic to see what you can do with it too..
See you soon
Hugs
For todays FREEBIE I had to draw my version of a lovely vintage photo of Fred and Ginger dancing... here it is..
I hope that you will have lots of fun with this image as it is just crying out to be full of colour and bling.. just like this card I made ...
I paper pieced her dress with some pretty paper. They are both coloured with promarker pens and have added a pearl pen for her jewellery. The spot light beam is irridescent vellum which really does catch the light in a lovely way... as you can see here....
.... the sentiment is from the Create with TLC blog
I hope you like my freebie for you today - I would love to see your comments and of course it would be fantastic to see what you can do with it too..
See you soon
Hugs
Friday, May 27, 2011
LIM Butterflies..
Here is my second card - DL size, for the Less is more challenge this week - Butterflies..
I die cut and inked the narrow frame first with Tim Holtz antique linen and then with a touch of black on the edges. I did the same with the little butterflies. the centre piece in the frame is part of another embossed image from a sissix halloween embossing folder. I finished off by adding the words and the little tiny black pearls (pearl pen) for the butterfly bodies.
I will be having a Freebie this weekend... come back soon to see what it is..
Hug
I die cut and inked the narrow frame first with Tim Holtz antique linen and then with a touch of black on the edges. I did the same with the little butterflies. the centre piece in the frame is part of another embossed image from a sissix halloween embossing folder. I finished off by adding the words and the little tiny black pearls (pearl pen) for the butterfly bodies.I will be having a Freebie this weekend... come back soon to see what it is..
Hug
Sunday, May 22, 2011
Less is More - Week 16
The theme over at the Less is more challenge blog for this week is - Butterfly / Butterflies...
Today is my Birthday and my friend gave me nestabilities lables 20 for one of my pressies... they are really pretty so I had to use them on the card for this week's challenge.
Here is my card for this week....
...as you can see I used the long side of the die to cut the top of the card creating a pretty edge. My cuttlebug had no problem cutting through the two layers of card together. I did this by slipping the cutting edge at the top of the card and the rest of the die behind the folded card... I taped it in position with low tack tape to keep it in place.
The butterfly stamp is one that I have had for years - a gift from another friend. ... and of course the flowers are from Joanna Sheens pressed flower stamps...I used promarker pens to colour them in... I started with the full rose, masking that to stamp the second... I masked that one too.. and carried on with masking as I went to build up to look of roses in a basket. The basket is a piece of beautiful textured wallpaper.
.. Well that's it for now, I might be temped to do a few more cards for this challenge as I love butterflies... well, who wouldn't.. Lol
BFN
Hugs
Today is my Birthday and my friend gave me nestabilities lables 20 for one of my pressies... they are really pretty so I had to use them on the card for this week's challenge.
Here is my card for this week....
...as you can see I used the long side of the die to cut the top of the card creating a pretty edge. My cuttlebug had no problem cutting through the two layers of card together. I did this by slipping the cutting edge at the top of the card and the rest of the die behind the folded card... I taped it in position with low tack tape to keep it in place.The butterfly stamp is one that I have had for years - a gift from another friend. ... and of course the flowers are from Joanna Sheens pressed flower stamps...I used promarker pens to colour them in... I started with the full rose, masking that to stamp the second... I masked that one too.. and carried on with masking as I went to build up to look of roses in a basket. The basket is a piece of beautiful textured wallpaper.
.. Well that's it for now, I might be temped to do a few more cards for this challenge as I love butterflies... well, who wouldn't.. Lol
BFN
Hugs
Monday, May 9, 2011
More WOW with Swans
I drew these swans the other day and had to make a couple of cards with them.
For the first card I used 2 embossing folders to create a background image and simply stuck the cut out swans with foam pads.. adding the words on the side like a tab. I pierced the edges of the card just to add more texture - a really simple card..
This will be my 3rd submission to the Less is more challenge this week.. White on white cards are so much fun to make! here is my White on white card No. 3


For the second card, I printed the swans out twice, one for the background and one to add the cut out swans over the top. I used Tim Holtz distress inks to create the background. I decided to use a very pale blue card to blend with the image adding a pale pearlescent green card under the punch out area to balance the card. Of course a little bit of glitter had to be added to the wings..and small amounts to the water too plus a few pearls.
Thank you for stopping by my blog today..
See you soon
Hugs
For the first card I used 2 embossing folders to create a background image and simply stuck the cut out swans with foam pads.. adding the words on the side like a tab. I pierced the edges of the card just to add more texture - a really simple card..This will be my 3rd submission to the Less is more challenge this week.. White on white cards are so much fun to make! here is my White on white card No. 3


For the second card, I printed the swans out twice, one for the background and one to add the cut out swans over the top. I used Tim Holtz distress inks to create the background. I decided to use a very pale blue card to blend with the image adding a pale pearlescent green card under the punch out area to balance the card. Of course a little bit of glitter had to be added to the wings..and small amounts to the water too plus a few pearls.
See you soon
Hugs
Subscribe to:
Posts (Atom)