I made quite a few samples with the new stamps I designed for Joanna Sheen...
1
I stamped the pansy onto cotton fabric in a pale colour and then used it as a pattern to embroider the design using silk embroidery threads. Here is a closer look...
This
card was great fun to make, I used one of Sue Wilsons lovely dies as a
frame adding stitching to match the Pansy. I used the Maiden hair fern
embroidery stamp for the corners and little flower stamp that is also on
the same sheet. The Best Wishes is from an embossing folder that I cut
out and added stitched with pen.
2
I stamped and embossed the Poppy 2 times - in Red and Black and one in Gold, then
layered the red and black over the gold one. I stamped these onto some
Buckrum (it's what I had to hand) but any material would give the same
effect. Again I used one of Sue Wilsons lovely dies to create the frame
withe some added stitching in gold thread and faux stitches. All of
the background is embossed black card and I've used a white gell pen all
over the raised pattern to give the effect of more stitching.
3
This
card took a bit longer because I needed to practice stamping the heart a
few times before hand onto scrap paper so I could stamp the heart on
one layer for the card. I stamped and embossed the heart (onto white card) using both the corner (top and bottom of heart)
and the single maiden hair fern stamps (around the sides of heart), I
stamped the corner stamp in each corner adding white powder then I used
my versamark embossing pen to lightly highlight the leaves and
re-applied some sparkly clear powder and heated again to set it. I used
distress inks to add the colour. I stamped the background using the full
Embroidered Rose from the sheet in 2 different colour distress inks..
Bundled sage and Iced Spruce.
4
I masked the corners with post it notes and stamped the knitted border stamps from the Joanna Sheen I love kniting stamps Then I stamped the Daffodil embroidered flower stamp creating
the square in the middle with the straight stitched edge of the stamp.
I then stamped the Pansy in the centre and the embroidered Butterfly
into each corner. Added lots of red gemstones around the outside edge
and the greeting to finish the card.
5
For the topper I stamped the full embroidered Rose first, then I cut out a mask to cover it to add some stamped leaves with the Rose Leaves stamp, then I masked these as I went along adding some embroidered Rose Buds, again masking as I went. Masking is a lovely technique
that I love doing, it's a real thrill once you peel off all the layers
of masks to reveal the one layer stamped image. The butterfly border is
the embroidered Butterfly stamped and embossed in whte powder with some
pink distress ink rubbed over the top.
6
I stamped the background using most of the Joanna Sheen Embroidered Flower stamps. I stamped the embroidered Fuschia for the topper. Instead of embossing each time I stamped I decided to stamp everything and then use my Sakura gelly roll clear stardust pen over each stamped image, it was quick and gives a lovely sparkle too.
7
For this Pansy card I divided a piece of card into 9 squares adding the faux stitches to mark it out. Then I stamped the embroidered Pansy into each of the outside squares tilting the angle each time to add the feel of movement. I went over each Pansy with the Sakura clear stardust pen for a bit of sparkle and added the Best Wishes in the middle.
8
I stamped the middle topper straight onto vellum embossing with white powder as I stamped. I also stamped 4 of the embroidered Poppy leaves on vellum with the same white powder..cutting these out. I coloured the embroidered Poppy and leaves using a promarker pen on the reverse side of the vellum. I stamped the background using the same Poppy leaf stamp onto some printed paper with stripes and again embossing with the white powder as I stamped. I colour them using promarkers and inked the edges with distress inks. I puched small holes in each corners of the card and around the topper and threaded some thick red cotton through them to create the frames.
9
This card was easier than it looks. I stamped the embroidered full Rose onto black card for the bottom part, I stamped 3 of the same Rose with black momento ink but stamped each one seperately again without re inking to create a paler greyer outline, then finally I stamped 3 of the same Rose using Victorian velvet distress ink. I layered the roses with the black on the bottom, then grey with the pink on the top layer, cutting part of the Rose away each time. The embroidered Rose leaves were stamped and coloured ready to put on the card under the Roses. I used one of Sue Wilsons lovely dies add a bit of frillyness and I stamped one embroidered Rose Bud to stick next to the greeting.
10
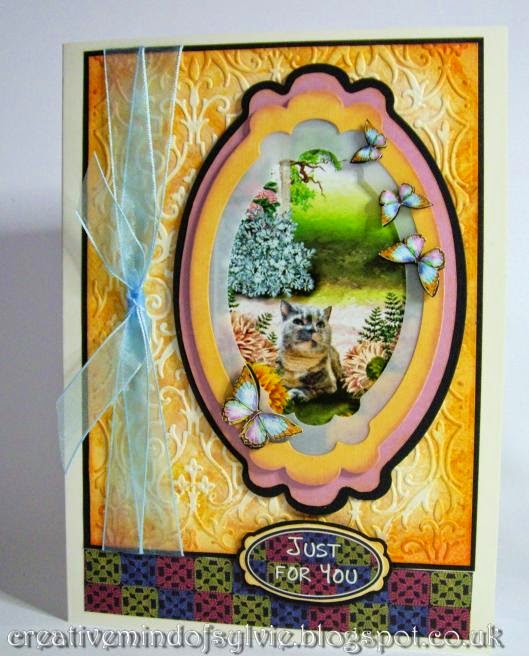
Onto a cut out round piece of card, I stamped and embossed the picture using the embroidered Maiden hair fern, Fuschias, Butterfly and tiny flower stamps. The green ribbon was stuck to the underneath pleating it as I went to create a frilly effect. I cut a petal shape from black card and stamped the Maiden hair fern stamp using some picket fence distress stain ink. The background is stamped onto a piece of card with the Joanna Sheen everyday Patchwork stamps
11
The topper for this card involved alot of masking. I stamped the embroidered full Rose first, masking that to stamp a second one just below to the right a bit and then masked that too. I stamped the leaves and added masks, stamped the swirly stamp and finally I stamped the corner Maiden hair fern top and bottom and stamped the single maidern hair stamp around the sides... all with Chipped Saphire distress ink. I used very pale promarkers to add some colour. The beautiful William Morris backing paper is from the Joanna Sheens Age of Elegance CD Rom
12
I stamped the embroidered Poppy and leaves onto vellum and each of the corners onto green vellum - embossing all with white embossing powder. I cut each image out but left a bit of the green vellum showing around the corners. I coloured the embroidered Poppy and leaves on the reverse side of vellum with promarker pens. I used pinflair gell to glue each part to the black topper and each of the corners.
13
I stampedand embossed the embroidered Pansy 10 times onto vellum, I coloured them with promarker pens on the reverse, cut them out and layered them up. I used threads and seed beads to create the landscape for the flowers.
Thank you for visiting today :)