Saturday, August 25, 2012

Win this corset card!

This bodice is from the Girly Lace Stamp sheet that I designed for Joanna Sheen.

There are so many ways to use it whether it be stamping and colouring, paper pieceing, gilding, but for this card I used heat bondable Angelina fibres.  First of all I inked up the rubber stamp with Stazon Ink, then chose my fibres and layed them over the image, covered with a piece of parchment paper and held an iron on it for a few seconds until I could see the faint image of the bodice through the paper.  When I lifted  the  fibres off the stamp I had this lovely textured bodice.  I repeated the process over the bow and the rose so that I could layer them on top.  I punched holes down the middle and threaded some narrow ribbon.  To finish off I used fabric glue to sprinkle some sparkle fibres at the top and the bottom of the bodice.

I Stamped two lace borders embossing with them with white powder, the lace borders are from the Live each moment Lace set.  I then inked with the lovely new Tim Holtz Shaded Lilac distress ink, cut each one out and stuck them down the sides of the card.  I measured the middle gap, cut a piece of card to size and covered with some beautiful spider web netting, sticking it down on the back with tape.. and then sticking to the card ready to stick the bodice and Happy Birthday down with pinflair glue.
I hope you like it.

Would you like to win this card?  I've decided to extend  this due to the holiday weekend, so please feel free to leave a comment  anytime up to midnight Friday 31st August GMT if you are interested and I will randomly pick a winner.  
Thanks for visiting today.. see you soon
Hugs
x

Thursday, August 23, 2012

Wedding samples

All these samples are made using the Joanna Sheen Lace stamps

 (1) This first card is a folded piece of Black A4 card, folded along 2 DL  scored lines.  I have seen this idea for a heart flap on the web so decided to create my own, so I drew a heart template and used it to cut out the heart on the front flap on the black card. Then I cut another heart from some lovely pearly card but before I glued it to the front, I punched a small hole for the ribbon to poke through near the edge on the side and another hole at the same height level on the right side of the middle part. I also punched another hole on the black heart at the same level again,ready to thread the ribbon back inside. 

I printed out the details of the wedding onto some Ivoy paper cutting both this and a blank piece to the same size to fit in the panels. I stamped the Lace border along the top with black Ink then stuck them inside. Once I had done that I threaded the black ribbon  making sure it is level and only then did I stick the Ivory pearly heart onto the front securing the ribbon and it looks neat, plus the ribbon over the middle panel means that extra printed instructions or other info can be added and stay neatly in place.  I also added little pockets, these are cut to size a bit narrower, stamped and embossed with white powder, I edged mine with more black ribbon and stuck down with foam pads around the edges creating a pocket.  All the black card on the pockets and the right flap have pinstripes that I made with a stardust pen. 

 (2) This is a 6 x 6" cream card with the inside pockets added with foam pads.  The front panel is the small flower stamp on the Live each moment Lace stamp sheet stamped and embossed white onto a piece of black card.  Then I layed a piece of Ivory spiderweb netting on the top and taping it on the back to hold it in place. I stamped the Lace border onto black card with white embossing powder, cut out and added it to the panel, after I added a strip of black ribbon, I glued it to the front of the card. I made a simple cream Rose to the ribbon.  The Letters for Invitation on the fron are die cut with cream card using Tim Holtz Decorative Typeset Strip Alphabets die.

 Inside I added a black card panel.  Then I cut a piece of cream card the same width, stamped both the Lace Corners , trimmed to the shape then matt and layered onto black card and stuck it down with foam pads on the edges. I printed out the information, stamped the lace borders along the tops, added the black ribbon bow to finish it.


(3) This invitation used the Goals you reach stamp sheet.   Again it is 6 x 6" cream card.  I used an embossing folder on vellum to create the top panel. The lacey strip is also stamped onto vellum and cut out then stuck onto the embossed panel with thin DST, I added the red ribbon folding it round the edges and stuck it as one panel onto the card.  The Wedding invitation was stamped onto vellum with Mahogany distress ink and embossed with clear embossing powder.

 Inside, again like the previous invite,  I added a panel with rounded corners. To get the exact border I used Mahogany distress ink to colour the edges of a panel and used that to mount the cream cut out panel onto and then timmed it.  I stamped 2 of the corner lace stamps onto vellum cutting the corner edges a bit bigger I scored and folded inwards, rounded the corners then I added pinflair to the folded pieces sticking them down lining them up to the edges. Then I printed out the info, stamped the lace border onto each piece with Mahogany distress ink, rounded the corners again and popped them in the pockets once the pinflair was completely dry.


(4)  This card invitation used the corner stamped onto a panel and embossed with white in each corner, then inked with Antique linen distress ink, then matt and layered onto red card leaving a panel at the bottom where I used a border punch. The layered panel and the words are also stamped, embossed and inked the same way.  Pretty spoty ivory ribbon around the panel and as a bow were added then I glued everything to the card base.
 The inside panel is a printout with the info  and a printed border.  I used the edge of the corner lace stamp to create the borders down the sides.. again with white embossing powder and inked with Antique linen ink.

(5) This card used the Take one step Lace stamp sheet.    On other invites I've made before (with pressed flowers) I have used a piece of long card to fold this type of card, but I don't have any large white card sheets, so I used 2 6 x 6" cards stuck together creating 3 sides. I cut one side to create the bottom flap.I used a pale green/grey colour thin card to add the panels shown.. The front raised piece has tiny white polka dots which I thought looked pretty.  I used both the hearts and the border from the stamp sheet on the front and inside

 For the lacey heart on the printed panels, I stamped with versamark and used chalk to colour, I didn't have the right colour so scraped the dust of a few colours mixing them until I was happy with the shade and dusted the stamped image with a brush.

 (6) This last card used the border from the sheet.  I stamped and embossed it with white powder 4 times then inked with blue distress ink, cut them all out.  On the 8x8" card, I glued a piece of white spider web netting cut to 6 x 6" in the middle of the net.  The middle can be anything, decoupage, a photo, a sentiment... I chose to use a Rose I made.  first I stuck down the borders using only 3 segmants from each border arranged as shown.  Then I added the rose in the middle.  3 pearls in 2 corners balanced the words in the other corners. I added a few punched butterflies too.

Thank you for visiting my blog today, I hope I've inspired someone to have a go at using the Lace stamps to create your own invititions and cards.  
See you soon
Hugs x

Monday, August 20, 2012

Joanna Sheen Nature Lace samples


 I really enjoyed the TV shows Joanna did yesterday and her demos were fab! 
Here are the sample cards I made for her using my latest designs.

 
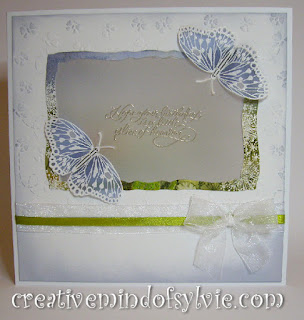
This card is 8 x 8".  First I stamped a scene using all the stamps.. masking as I went. Then I die cut it with 2 sizes of die creating both a frame and a topper from the same piece.  I used the topper frame on the front to surround a vellum window  with the sentiments from a Jane Shasky stamp.  The butterflies are stamped on vellum embossed with white and coloured blue from behind with a promarker pen.  The butterfly on the inside with the topper is stamped in black and cut out.

 For the topper, I drew round a circle lightly with pencil to use as a guide to stamp the honesty, I turned the paper as I went keeping the rubber in the same direction as I stamped, when the ink was dry I rubbed out the pencil lines. I used Forest moss distress ink.  I added the pearly look with a glue pen and pearl foil.. I love it because it makes them look like the real pearly honesty seed heads.! I added a tiny bit of  mica powder aswell because I sometimes find that even though I have added foil, it still feels a bit sticky..so the mica powder eliminates that and looks gorgeous at the same time.
 
In the background I stamped the Dandilion head randomly and embossed with white powder, then inked with green. The sentiment is a printout.  The butterfly was stamped with black, lightly coloured with ivory and again I added some pearl foil...(probably because I am totally addicted to using foils LOL)..

To create window I masked an oval and the cross then stamped various foliage stamps, leaving the look of a window.  Stamped Jug in blue and coloured with ivory lightly. I stamped the honesty direct to paper (masking the jug).. and also stamped some onto other card to cut out the heads.  I added glue pen and pearl foil and arranged the extra heads with the rest. I used the Lace corner from the Live each moment Lace Stamps sheet to create the table lace.


Most of this topper is stamped on one layer and all with Walnut stain distress ink.   First I stamped the Jug, masked it, then stamped the first leaves, leaving the jug masked and masking the leaves, I stamped more leaves, I stamped the leaves 3 times masking as I went.  The leaves that over hang the jug were stamped on other card and cut out to add on.  To create the table, I left the mask on the jug and then used post it notes to mask the area behind the jug, leaving the table area to stamp.  I used the stem of the dandilion head to create the lines then used a piece of cut and dry foam to shade the area making it more shaded around the base of the jug (which is still masked).. then once all the mask layers are peeled away, you have a pretty little topper.  I stamped and added the Roses from the Girly Things stamp sheet   because they are the exact right size for this. The wooden hanger at the top of the card is a disposable stirrer  availble from most coffee shops LOL..

 Two embossing folders with whitewash co-ordination card were used to create the background.  The topper is just the dandilion head stamped and embossed with white powder and then inked, the sentiment is from the Take one step Lace stamp sheet


Thank you for visiting my blog today.. I'll be back again tomorrow with the wedding card samples shown on TV.
Hugs
xx

Sunday, August 19, 2012

Joanna Sheen Girly Lace Stamp samples with FREEBIE

 Joanna Sheen's new Girly Lace stamps were designed by me.  You can purchace them either on C&C website or from the Joanna Sheen Shop where she does worldwide postage

I really enjoyed the show this morning - what fab demos Joanna did live on air. 
You can see another show later today at 5 pm with Joanna on Create and Craft TV
There are so many ways to use these stamps... here are the sample cards I made for Joanna.

For this 8 x 8" card I created a stamped background with the rose designs using Tim Holtz distress ink. I used the Tied together embossing folder with black card for the edges with black gems.
The 'suspenders' above and below the image are actually 'D' rings with ribbon, I coloured the rings with a black promarker pen.  I stamped the bodice onto acetate  with stazon, and also onto watercolour paper.  I coloured in the watercolour paper image using distress inks  then layered the acetate over the top.


 This card grew as I made it Lol!   The wrap is vellum stamped with the rose stamp.  The card underneath is white with coloured black edges with a promarker pen. The bottom flap is an additional piece of card folded, stamped and stuck to the back panel so that all 3 sides join to create the pocket for the card.  I used the Frog fastner stamps to thread ribbon.. stamping white onto black card and cutting them out.  I used a hole punch to make neat holes to thread the ribbon. I also thought that the frog fastner was great to pull the card out with, so I stuck them together back to back at the top.
 For the card inside the pocket I stamped the bodice onto vellum twice embossing with white embossing powder. I cut out the rose and bow from one for layers.  I used the Aqua promarker pen to colour the back of the vellum to give a pretty glow then used a ball tool to emboss from the back adding tiny white raised details. I did this to the cut out bow and rose aswell. I glittered parts to add more sparkle.  I covered a panel of card with some tulle netting and white ribbon down the middle and glued the bodice with pinflair glue.  The lovely lace border on the sheet was stamped with gilded ivory powder on black card.  For each side of the  frills, I stamped the frilly stamp twice in a line embossing again with white powder, cut them out and dry embossed on the back to add texture. Both these frills were stuck onto the card before adding the bodice topper. I used some black glitter to highlight the ribbon on the frilly borders.


 I adaped an old template to make the screen from one A4 piece of card, inking it lightly to age it a little.  The bodice stand is a FREEBIE for anyone that would like to use it and is available at the end of this post to download.
I stamped the bodice twice, one onto patterned paper embossing both.  I cut out the patterned panels and paper pieced them onto the bodice.  a promarker coloured the other parts.  I puched tiny holes to thread the thin ribbon using the big bite  then made a rose from ribbon (not a very good one, my first attempt LOL).. and a bow.  As you can see I stamped the boots, embossing with red powder. The glitzy edgeing are sparkle fibres.  I added tiny 1.5mm gems to the front .. that took ages Lol!

 There are lots of places where you can get this idea and templates for side step cards on the web.. I added 3 rectangles, an embossed top panel and used one of my nesties to draw around and cut out the bottom of the chest of drawers.  Little gems make pretty knobs.  The mirror was created with spellbinders lable No.10 with an oval cut out and mirror board.  The bodice has been stamped and coloured with promarker pens. I've used a glue pen to add foiling detail to the spots and the panels. The boots were stamped twice.. the lace part was embossed with white cut out and paper pieced onto the black stamped boot.


For this card I stamped the lace border from the Live each moment stamp sheet directly onto the card down each side with black versafine ink.   I am a big fan of paper piecing the bodice because it adds so much more that just colouring it in.  I've used two extra stamped bodices, one on blue pattern paper and one onto a matching beige colour.  the top part has been coloured with Asure promarker pen, I've also coloured the sides of the card with the same colour.  I've  created gold dots using a glue pen and gold foil.

Here's the FREEBIE  for you.  You should be able to print it out, cut out and use.  I have tried to make it the exact size to hang the bodice onto.
here it is.. click onto the picture and save to your computer.
Thank you for visiting my blog today.. I will be adding the Natures Lace stamp samples later today or tomorrow..

Saturday, August 18, 2012

I'm on Facebook

I've started a page on Facebook. 

You can browse my galleries full of all the sample cards I have made and you can add your comments and show us your creations too.  Click on the link and 'like' my page to join in.

As soon as Joanna has finished her shows tomorrow, I will be posting photos of all my sample cards with a  FREEBIE  to share both here and on Facebook...

see you soon...

Thursday, August 16, 2012

Joanna Sheen - Back to Nature Rubber Stamps

Here are my latest designs for Joanna Sheen
they will be launched Sunday 19th August on Create and Craft TV

Joanna Sheen - Girly Things Rubber Stamps

 Here are my latest designs for Joanna Sheen
they will be launched Sunday 19th August on Create and Craft TV

LinkWithin

Related Posts with Thumbnails