Showing posts with label Acetate. Show all posts

Sunday, October 2, 2016

TV sample cards and a free template

Here are some sample cards I made for Joanna Sheen's last TV shows.


This card was fun to make with the little lights added to the tree.
The bunting and backing paper are from the JS Christmas Paper pad.
The topper frame is an envelope to the thickness of the battery case (about 5 mm)with a cut out
opening – also helps keep the light inside where it's
wanted. I printed the image from the CDRom twice onto matt photo paper and again onto some vellum.
I punched holes where the candles are on the tree, layered the vellum under the image matching it up.
I cut out the little girls from the second printout layering them on top.
On a piece of card the same size as the topper I stuck down the lights where the candles are on the tree. I added mini Holly dies
The starry night Edger makes a magical edge for the easel to stand against.. I added mini Fir branch dies and the greeting and some pearls.

This card uses some burlap sparkly ribbon that
 I pulled apart for the frame around the topper.
Used Mini Fir branch die with faux red pearl pen added for a 
touch of festive colour.
Added The Holly Edger in 2 rows with light
inking for a more vintage feel.

Printed Angel and flowery papers from CDRom
All layers were sanded, pieced and added faux
stitching. Starry and snowflake papers from
JS Christmas pad.
andmini Fir die coloured with promarkers
Tiny pearls add sparkle and the pom pom
braid gives the feel of snow.

 
Printed out Santa topper adjusting the colours
to give a more sepia look. sanded the edges and added glitter..
Distressed the edges by sanding on all
4 backing paper layers from JS Vol 2 pad
added glitter on edges of top 2 layers
Layered them all onto the Red card stock
Added ribbons and silver bells plus the 25th 
with promarker pens
Added a mixture of real flat pearls and faux
pearls with a pearl pen.


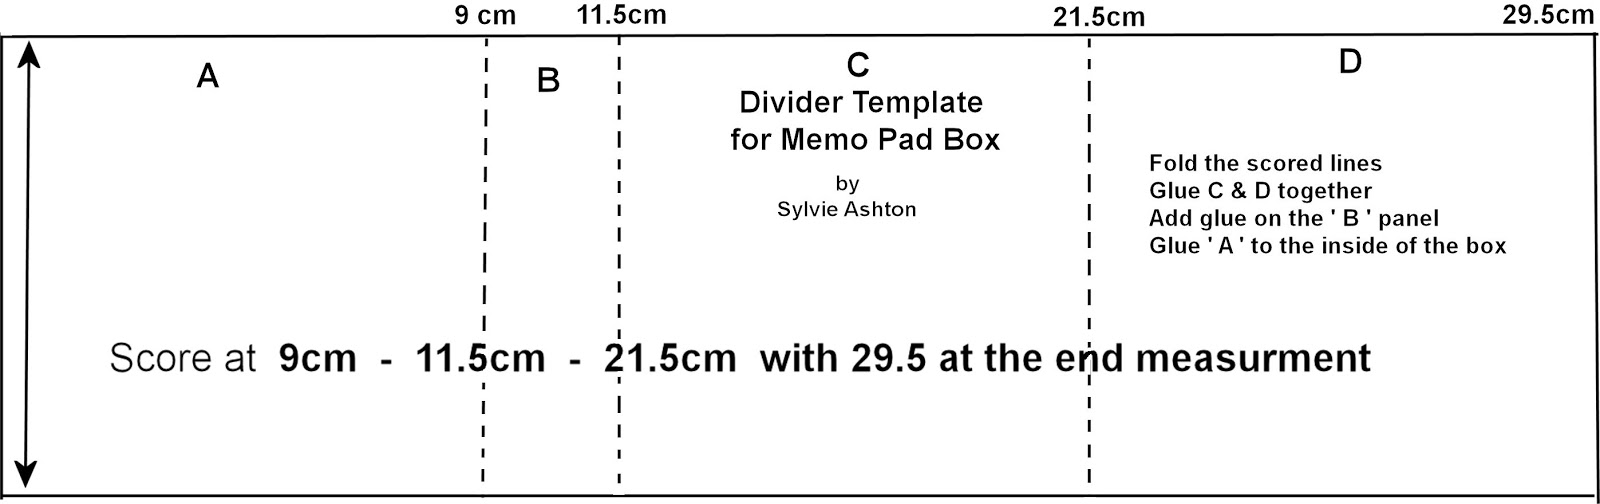
I made box up as per template instructions
Added background paper from JS Vol 2 pad
also pretty winter images from the Jane Netley Mayhew Pad.
added Pom Pom braid around edge
Basic template & Instructions available at the end of this blog.


... and with the lights on....

 
I printed out the image from the Josephine Wall project book (No 9 Dew Drop Dancers)
Matt and layered the image, punched a hole
under the top right leaf (where the added layeres
will cover it up).then punched a hole through the main layer on the card and through the card front itself.
Then I poked the little lights through the hole to the image glueing them onto the drew drop carefully. Once this was dry I layered up all the layers and the netting. The Fairy Aurora die cut x2 from purple card – I added sparkly organsa in-between the layers of her wings for a more magical effect.
The lights are taped unside the card making it easy to turn them on and off.

I cut the tree shape from a Wood effect paper from the JS paper pad Vol 2 I chose the part with a knot in the wood so I could cut it out and layer the picture beneath. I cut a rough door shape for the fairy door and again adding an image to a secret word beneath the tree cut out. The die cut mini fairies have wings with sparkly organsa for shimmer. I added glitter to the main Topper image (No 4 Secret Garden) from the Josephone Wall project book and layered it up
The inked backing paper is from the pad along with the grass and floral edge.

I tore several pieces of the papers from the JS
Vol 2 paper pad to make the background. I cut out various little children from the Faye Whittaker pad plus the little boy by his beach hut.
add more to the little scene.
I used a red pen to add the red stripe around the edge of the card.

Used the Weathered Wood backing paper from the JS pad Vol 2 – cut out each plank and sanded back and then inked with Blueprint Sketch distress ink. Die cut the beach huts and birds
the Lifeboat ring was cut freehand with added
string for a beachy feel.

Thanks for visiting today but before I go: I made  up these templates for you to print out and use if you would like to have a go at making your own Memo pad box - just print out (to get actual size, print each of them on 2 halves and stick the A4 bits together if you don't have a printer big enough)



Sunday, July 14, 2013

Joanna Sheens Victorian Christmas Cards CD Samples

Joanna launched a brand new Christmas CD on Friday


I loved making these samples for the show

This one uses the large topper on the printed sheet. I layered it onto gold and red and for the background I used torn papers to continue the snowy scene in the picture.

 I used the larger topper on the printed sheet plus one of the star decorations from the decorations section on the CD.  I scored lines and folded the star to make it 3D.  I put an acetate sleeve over the picture adding white dots all over for a more snowy effect. Both the backing papers are on the CD.

 I used the large topper and a smaller one from the sheet.  I made a shaker bauble with the smaller one adding a frilly lace edge.  I added tiny blue stars and gems all over the card! The backing papers are from the CD.

 I used a larger topper and smaller one on the sheet plus the backing paper and sentiment. This card is simply matting and layering with a lovely bright polka dot ribbon bow.

 I used the large topper and the backing paper that already had the small round image in the corner. The snowflake frame is punched out as is the red border at the bottom.

 I used one of the smaller images on the printed sheet with one of the sentiments. Everything else is cream card embossed and gently highlighted with Antique linen distress ink. The background was scored on my hougie board. I added punched holly, some gold papers and gems to finish.

Thank you for visiting my blog today.  I hope I've inspired some of you to have a go at CD crafting.

I'll be back later with my samples from the Vintage floral stamps.

Sunday, August 19, 2012

Joanna Sheen Girly Lace Stamp samples with FREEBIE

 Joanna Sheen's new Girly Lace stamps were designed by me.  You can purchace them either on C&C website or from the Joanna Sheen Shop where she does worldwide postage

I really enjoyed the show this morning - what fab demos Joanna did live on air. 
You can see another show later today at 5 pm with Joanna on Create and Craft TV
There are so many ways to use these stamps... here are the sample cards I made for Joanna.

For this 8 x 8" card I created a stamped background with the rose designs using Tim Holtz distress ink. I used the Tied together embossing folder with black card for the edges with black gems.
The 'suspenders' above and below the image are actually 'D' rings with ribbon, I coloured the rings with a black promarker pen.  I stamped the bodice onto acetate  with stazon, and also onto watercolour paper.  I coloured in the watercolour paper image using distress inks  then layered the acetate over the top.


 This card grew as I made it Lol!   The wrap is vellum stamped with the rose stamp.  The card underneath is white with coloured black edges with a promarker pen. The bottom flap is an additional piece of card folded, stamped and stuck to the back panel so that all 3 sides join to create the pocket for the card.  I used the Frog fastner stamps to thread ribbon.. stamping white onto black card and cutting them out.  I used a hole punch to make neat holes to thread the ribbon. I also thought that the frog fastner was great to pull the card out with, so I stuck them together back to back at the top.
 For the card inside the pocket I stamped the bodice onto vellum twice embossing with white embossing powder. I cut out the rose and bow from one for layers.  I used the Aqua promarker pen to colour the back of the vellum to give a pretty glow then used a ball tool to emboss from the back adding tiny white raised details. I did this to the cut out bow and rose aswell. I glittered parts to add more sparkle.  I covered a panel of card with some tulle netting and white ribbon down the middle and glued the bodice with pinflair glue.  The lovely lace border on the sheet was stamped with gilded ivory powder on black card.  For each side of the  frills, I stamped the frilly stamp twice in a line embossing again with white powder, cut them out and dry embossed on the back to add texture. Both these frills were stuck onto the card before adding the bodice topper. I used some black glitter to highlight the ribbon on the frilly borders.


 I adaped an old template to make the screen from one A4 piece of card, inking it lightly to age it a little.  The bodice stand is a FREEBIE for anyone that would like to use it and is available at the end of this post to download.
I stamped the bodice twice, one onto patterned paper embossing both.  I cut out the patterned panels and paper pieced them onto the bodice.  a promarker coloured the other parts.  I puched tiny holes to thread the thin ribbon using the big bite  then made a rose from ribbon (not a very good one, my first attempt LOL).. and a bow.  As you can see I stamped the boots, embossing with red powder. The glitzy edgeing are sparkle fibres.  I added tiny 1.5mm gems to the front .. that took ages Lol!

 There are lots of places where you can get this idea and templates for side step cards on the web.. I added 3 rectangles, an embossed top panel and used one of my nesties to draw around and cut out the bottom of the chest of drawers.  Little gems make pretty knobs.  The mirror was created with spellbinders lable No.10 with an oval cut out and mirror board.  The bodice has been stamped and coloured with promarker pens. I've used a glue pen to add foiling detail to the spots and the panels. The boots were stamped twice.. the lace part was embossed with white cut out and paper pieced onto the black stamped boot.


For this card I stamped the lace border from the Live each moment stamp sheet directly onto the card down each side with black versafine ink.   I am a big fan of paper piecing the bodice because it adds so much more that just colouring it in.  I've used two extra stamped bodices, one on blue pattern paper and one onto a matching beige colour.  the top part has been coloured with Asure promarker pen, I've also coloured the sides of the card with the same colour.  I've  created gold dots using a glue pen and gold foil.

Here's the FREEBIE  for you.  You should be able to print it out, cut out and use.  I have tried to make it the exact size to hang the bodice onto.
here it is.. click onto the picture and save to your computer.
Thank you for visiting my blog today.. I will be adding the Natures Lace stamp samples later today or tomorrow..

Tuesday, February 14, 2012

Pressed Flower Wedding sample - Day 6

For this wedding invitation I used two single blue Daisy flowers. It is very simple to do


. I cut a piece of textured card to size. Using a circle punch I punched a hole roughly in the middle of the right hand side . I layed this over the card as a guide to stick my flower then glued a piece of acetate to the back of the appeture. Before sticking the panel down I stamped 'Wedding Invitation' in blue and run some lace across the top of the panel holding it down with DST on the back. Once stuck down I added a few pearls.

For the inside of the invitation I did the same for the panel above on the flap - making sure to add a piece of ribbon to hold the RSVP in place under the flap - the ends are hidden under the panel.
.. adding die cut letters from the same textured card gives a different look.

Thank you for visiting my blog today. I hope I have inspired someone in blogland to have a go at using Pressed flowers.. they are beautiful to use on so many projects.

See you soon
Hugs

LinkWithin

Related Posts with Thumbnails