Sunday, July 14, 2013

A couple more patchwork cards

I also made these two samples for Joanna.  I used the Joanna Sheen Everyday Patchwork stamps on both of them
 Teddy Bear card
 I printed out 4 teddy outlines.  I stamped the 3 different coloured parts using the little hearts patches stamp on 3 bears.  I then cut out the parts and paper pieced them onto the 4th bear.  The background was stamped using the grid technique.  I glittered the edges of the background and the topper with stickles glue.

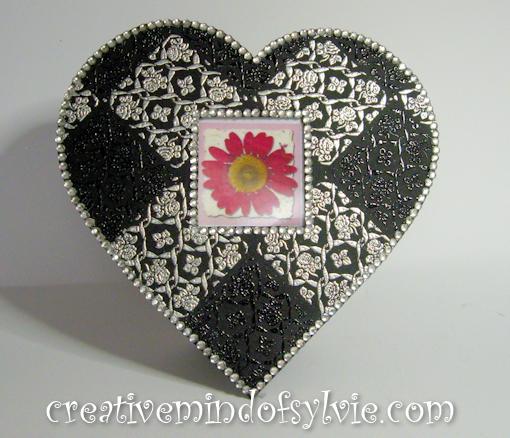
 Heart frame
I made the frame first, but you could use any frame that you have for this. I lightly drew around the heart onto black paper with pencil and used this as a guide to where I wanted to stamp my patchwork to look even on the frame, then I used the grid to stamp - embossing with silver and clear powders as I went. Then I cut it out and glued to front of frame adding lots of sparkly gems around the edges.


Thank you for visiting my blog to day.  I will be back later with more sample cards using the Vintage flower stamps.

Joanna Sheens Victorian Christmas Cards CD Samples

Joanna launched a brand new Christmas CD on Friday


I loved making these samples for the show

This one uses the large topper on the printed sheet. I layered it onto gold and red and for the background I used torn papers to continue the snowy scene in the picture.

 I used the larger topper on the printed sheet plus one of the star decorations from the decorations section on the CD.  I scored lines and folded the star to make it 3D.  I put an acetate sleeve over the picture adding white dots all over for a more snowy effect. Both the backing papers are on the CD.

 I used the large topper and a smaller one from the sheet.  I made a shaker bauble with the smaller one adding a frilly lace edge.  I added tiny blue stars and gems all over the card! The backing papers are from the CD.

 I used a larger topper and smaller one on the sheet plus the backing paper and sentiment. This card is simply matting and layering with a lovely bright polka dot ribbon bow.

 I used the large topper and the backing paper that already had the small round image in the corner. The snowflake frame is punched out as is the red border at the bottom.

 I used one of the smaller images on the printed sheet with one of the sentiments. Everything else is cream card embossed and gently highlighted with Antique linen distress ink. The background was scored on my hougie board. I added punched holly, some gold papers and gems to finish.

Thank you for visiting my blog today.  I hope I've inspired some of you to have a go at CD crafting.

I'll be back later with my samples from the Vintage floral stamps.

Friday, July 12, 2013

Christmas Patchwork Stamps and samples

Congratulations! to Joanna, I am delighted that the Christmas Patchwork stamps that are New - SOLD OUT during the TV shows on Create and Craft today.
I really enjoyed designing both these stamp sets

I used the Grid technique with the patchwork stamps for all of these samples.  I created the grid to help stamp each square in the right place when creating a pattern with the patchwork stamps.
You can download the grid with instructions here  

Here are the samples made by me that were on Joanna's Shows today.  

Tree easel card
First I cut a template for the tree shape then drawing round it onto white card to use as a guide to  stamp my patchwork pattern with versamark and WOW GLOW IN THE DARK embossing powder.
I then water coloured each green square with distress inks using 2 colours.  Only the green tree is glow in the dark.  The embossing on the base is normal white powder.This card is great fun, I couldn't stop looking at it glow in the dark Lolol!
This is how much it glows in the dark!!


Snowman Hearts
This card was so simple to do.  I die cut 8 hearts - Stamped half with the snowman and half snowflake stamps and the other half using the full snowflake and half snowflake stripe stamps all with a lovely pigmant ink pad  in blue shades. - placing them around the card that makes a star shape in the middle. I used a glue pen and sparkly foil to add faux stitching and the Merry Christmas is from an embossing folder - I used a pen to add dots to look like stitching on the letters.

Blue and white quilt card
I stamped the outer part first using the grid to guide to keep it all square, then on another piece of card I stamped the 9 square piece, cutting out and layering it on top of the base pattern.  The very middle is the star stamp from the Joanna Sheen I love knitting stamp sheet that I designed for Joanna last year.  I stamped it 4 times in blue layering it up and adding glitter to the top star finithing off with a gem in the centre and a few punched snowflakes in the corners.  the faux stitching was done with glue pen and silver holo foil.

Christmas patchwork Stockings
I cut out 2 stocking shapes one green, one grey.  I stamped a patchwork pattern onto each one embossing with white powder.  The white tops and toe/heel parts are cut out of felt. The rest of the card was done with embossing folders and punches.

Patchwork sampler
I decided to stamp a selection of 8" x 8" blocks using both the Everyday and Christmas stamps.  I used the grid to keep everything in line as I stamped.  These show how pretty the stamps can look and it is really simple to do.


Paper 3D star
I used this fabulous pattern that I got from the web a few years ago.  I cut out 5 of the larger pieces and stamped the patterns using 2 triangle stamps and 2 colours.  I embossed every time using a lovely gold sparkle opaque powder for a glimmer of gold.  All the lines are done with a versamark pen and gold embossing powder.  Once all 5 were stamped, embossed and scored, I folded each one and glued together with wet glue as per the instructions from the link above.  I think this makes a wonderful decoration.  These stars look fabulous stamped or unstamped and I am quite hooked on them LOLOL!!


Patchwork Cushion
I stamped the pattern onto 2 6" x 6" squares of white cotton.  I used distress inks but versacraft inks would have been so much better but I didn't have any.  I still ironed each one after stamping to set the ink although this will never be able to be washed... as the ink would vanish Lol!  I made 2 tassels with bright red wool.  I stuffed and sewed the cushion adding 2 sparkly buttons in the middle.

Raffia wreath patchwork card
I stamped and embossed with white part of the pattern onto kraft card,  I then stamped and embossed with red onto cream card, I cut the red ones out and pieced them onto the kraft card to finish the pattern I wanted.  I stamped a small square in the middle with 4 triangle corners layering this on top.  I made the raffia wreath by twisting the raffia in and out as I turned it. 

Stained glass look
Used a free STAINED GLASS template.  Printed out 8 – used promarkers to add one colour on  each sheet. I then stamped and embossed with clear powder on each coloured part using different stamp designs. Cut out each portion of the design and PAPER PIECED them onto the last  printed template using it as a guide. Once together I inked with distress ink
Advent Calendar
Stamped-embossed in Gold all the squares. Painted each of them according to the patterns.
Stamped and cut out inside of doors -sticking the advent squares to fronts. Glued whole design  onto 12” paper - Matt and layered  design onto papers and board. Added die cut numbers inside the doors.


Sunday, June 9, 2013

Patchwork Waistcoat card - TEMPLATE

A few people have asked me for the template for the Patchwork waistcoat sample card I made.


So here it is - click on image and save to your computer.
Details of how I made this card are Here

Thanks for looking today and I hope this inspires you in some way to make something yourself.

Friday, June 7, 2013

Joanna Sheen Patchwork Stamps

The Everyday set of the Joanna Sheen Patchwork stamps is NEW TODAY on Create and craft TV... I also designed a  Christmas Patchwork set  - Joanna will be bringing them to you next month.

It makes life easier when stamping if you use an acrylic block with a grid .. I don't have one so I decided to create one that can be printed out onto acetate and stuck onto a block.
Here is the link at the Joanna Sheen Ltd website for you to download the PDF doc.  All the instructions are also on the same printable sheet.


These are so much fun to play with. There are so many ways to use them on cards. I looked on the Internet for quilt block patterns (as I am not a quilter) that I could use for designs on cards, there are literally 100's of them to choose from in as many colour combinations too.
Here are  the sample cards that I made shown on  TV today.


8" x 8" card. I stamped all the patches onto one piece of card, the grid on the acrylic helped me keep the design straight. (Link to download the grid is above)
I used Tim Holtz ink pads - Seedless preserves, Weathered wood and Peeled paint - the Butterfly is from the Joanna Sheen I Love Knitting Stamp set I stamped with versamark and embossed with white embossing powder and then water coloured  it using the same colour inks as the patchwork.  I added the faux stitching around the edge after using a pricking ruler to make the holes.


8" x 8" card.  I stamped the design all in one colour to begin with making sure to use the triangles in the right places within the design. Then I coloured in the sail boat using promarker pens, adding faux stitching with a white gel pen around the boat pieces. I then used two embossing folders - one for the sky and boat and the swirls for the sea, I liked this because it adds texture and in a way simulates the stitching found on some quilts. It's a really easy and very quick way to use the stamps and make a patchwork card.


8" x 8" card.  I used Tim Holtz squeezed lemonade ink and two different multi-colour ink pads - one colour is called Tropical and the other is Pastels... both are pigment ink and I've had these pads in my stash for many years and they are still like new to use. If you have the new Tim Holtz pens or those little dew drop ink pads they could also be great to create a multi coloured inked patch.  I stamped and embossed  each one with clear powder all onto one piece of card and then used the pricking ruler guide to prick around each piece of the design and then stitched with red and white cottons.  The lovely topper is from the 


A5 size card.  First of all I cut a piece of card to the size I wanted for the quilt and then I embossed it using this lovely wire fence embossing folder, I used the de-bossed side to stamp directly onto using the  multi-coloured pastel pigment ink pad that I have. I think that leaving some of the area unstamped with only the white embossing really does look 'quilt like' (If that's a word LOL!)  The die cut pram was lightly rubbed with the ink pad and then  heat embossed with clear embossing powder.  The really cute little rabbit topper is again from Joanna Sheens Little Suzys Zoo - Snuggle up time  - sheet of stamps.


A5 size card.  I used a gate fold card to create the waistcoat shape (I will add a template later) I stamped lots of various patches onto black paper and embossed with various metallic embossing powders, then cut each one out and stuck onto a piece of blue paper creating a quilted backing paper.  I covered the waistcoat fronts with this adding the buttons to finish it off.  The inside has gold card lining along with the greeting.


A5 size card.  I made templates for the tea cozy envelope, the card and the teabag envelope. (see below).  To cover the tea cozy I created a backing paper first and stuck it to each side.  The tea pot and cup are an adaptation of the ones I used in this post - scroll down to find the template is on this page to download and save.


 I hope these cards will inspire you to buy these stamps and have a go for yourself. I will be sharing many more cards here in the the next few weeks so watch this space Lol..
Thanks for visiting today
Hugs x


Wednesday, May 29, 2013

More decorated Malma Frames

It's been a while since I've posted anything here, I've been busy designing new stamps.  I also had great fun a few weeks ago when I actually got round to decorating some Malma frames (sold by Ikea) for my daughter-in-Law.  She loved the ones I decorated a few years ago and I promised to do her some too.. it's taken this long!.  I have done these in exactly the same way as the previous ones.

I added the gold foil highlights so they will match the walls they want to hang them on.

I enjoyed making these so much and had a bit of free time so I went on to decorate another one for my daughter's friend who loves orange.  I added copper foiling for the highlights and a lovely Red/orange holographic foil with my hot foil pen.  I found a large button with a lovely texture, so I hot foiled that to match. It seems nothing is safe when I have the hot foiling pen out LOL!

  .. so this wasn't enough for me ... I still had the urge to carry on with the hot foil pen... so I made a key hanger as well.  I painted it purple and then added the Red/orange holographic foils with the hot foil pen. and the copper highlights
Thank you for visiting today... see you soon with some new stamps and sample cards
Hugs

LinkWithin

Related Posts with Thumbnails